


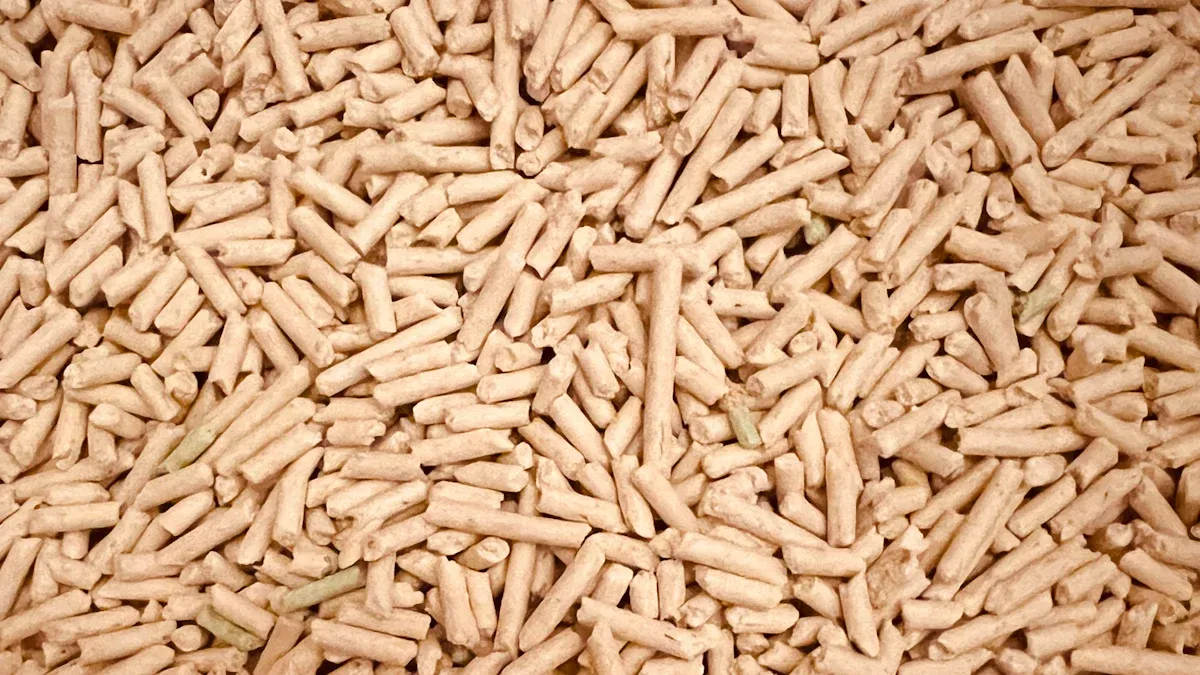
You make activated carbon pellets by getting raw materials ready. You mix them with binders. Then you shape them using extrusion. Next, you carbonize and activate the pellets. You need to watch each step closely. This goes from picking the raw materials to the activation step. This helps get high adsorption capacity and stability. People often use coal, coconut shells, and wood as raw materials. Pelletized Activated Carbon is very important in the world market. More people want it as companies improve how they make it and use better technology.
The world market for pelletized activated carbon was US$ 5.0 billion in 2022.
Experts think it will grow to US$ 8.3 billion by 2031.
Key Takeaways
Pick the best raw materials like wood, coal, or coconut shells. This helps make activated carbon pellets strong and good at adsorption.
Choose the right binders, either organic or inorganic. This makes sure the pellets stay together and work well.
Use the correct machines, like extruders and pellet mills. These help shape and process the raw materials into good pellets.
Grind and sieve the carbon sources to get the right particle size. This step is important for making strong and tough pellets.
Watch the carbonization and activation steps closely. This helps create the right pore structure and surface area for good adsorption.
Do quality checks, like adsorption tests, to make sure the pellets meet industry rules and work well.
Follow safety rules by wearing protective gear and making sure there is good airflow. This keeps you safe from chemicals and heat during production.
Think about how activated carbon pellets are used, like in air and water cleaning. This helps you know their market value and demand.
Materials and Equipment for Activated Carbon Pellets
Raw Materials Overview
You must pick the right raw materials to make activated carbon pellets. Each one gives the pellets different features. The table below shows the most common choices:
Type | Examples |
|---|---|
Raw Materials | Wood, coal, coconut, nutshell, olive pit |
Wood and coal make the pellets strong. Coconut shells and nutshells give a bigger surface area. Olive pits are a good renewable choice. You should pick the raw material based on what you need the adsorption capacity to be and how you will use the pellets.
Binders and Additives
Binders and additives help shape and hold the pellets together. You can use organic or inorganic binders. Organic binders like carboxymethylcellulose (CMC), guar gum, cellulose, starch, lignin, and polyvinyl alcohol help the pellets stick and stay clean. Inorganic binders like bentonite, lime, and cement make the pellets stronger and help shape them. Bentonite is good because it soaks up water and mixes well, but it can add extra minerals. Organic binders keep the pellets pure and help make more tiny holes.
You might also add things like sodium hydroxide or phosphoric acid. These help change the pH during making. Using the right mix of binders and additives makes sure your pellets stay together and work well for cleaning or filtering.
Tip: Always try a small batch with your binder before making a lot. This helps you not waste materials and makes sure the pellets are right for your job.
Essential Equipment
You need good machines to turn raw materials into pellets. The table below lists the main machines used in factories:
Equipment Type | Description |
|---|---|
Activated Carbon Pellet Extruder Machine | Shapes and forms the pellets efficiently. |
YULONG XGJ850 Pellet Making Machine | Produces pellets at a high rate. |
Yulong Activated Carbon Pellet Mill | Grinds and processes raw materials. |
Yulong Pellet Machinery | General machinery for pellet production. |
Pellet Dealing Machinery | Handles and processes finished pellets. |
132KW Pellet Processing Equipment | Supports large-scale production. |
Carbon & Char Extruders | Processes different carbon materials. |
Twin Packers | Helps feed materials into the pelletizer. |
Jacketed Barrel | Controls temperature during processing. |
Pick your equipment based on how much you want to make. For small amounts, a simple extruder and mill work fine. For big jobs, you need bigger machines and ways to control heat. Good machines help you make even, high-quality activated carbon pellets.
Optional Tools
You can use extra tools to make better activated carbon pellets. These tools are not always needed. But they can help you get better results. They also make your work easier and faster. Using them can change how good your final product is.
Here is a table that lists some extra tools and what they do:
Optional Tool/Enhancement | Benefits |
|---|---|
Impregnation for H2S, VOCs | Removes specific gases more effectively |
Acid washing | Lowers ash content |
Chemical impregnation | Targets certain contaminants like potassium iodide |
Surface modification | Improves selectivity for certain molecules |
High crush strength | Pellets stay strong under pressure |
Low dust generation | Keeps your workspace and product cleaner |
Excellent abrasion resistance | Pellets do not break apart during handling |
Lower pressure drop | Air or water flows more easily through the pellets |
High internal surface area | Captures more contaminants |
Engineered pore size distribution | Targets specific molecules for better performance |
Consistent batch performance | Ensures every batch works the same way |
Impregnation helps the pellets remove gases like hydrogen sulfide or VOCs. This step puts special chemicals into the pellets. It makes them work better for some jobs. Acid washing is another tool you can use. It takes out ash from the pellets. This makes the pellets cleaner and work better.
If you want your pellets to last longer, look for high crush strength and excellent abrasion resistance. These features help the pellets stay whole when you move them. Low dust generation keeps your workspace clean. It also stops problems in filters and machines.
Surface modification and engineered pore size distribution help you catch certain contaminants. You can make the pores the right size for certain molecules. High internal surface area means the pellets can trap more bad stuff.
Think about how the pellets work when you use them. Lower pressure drop lets air or water move through the pellets more easily. This helps your system work better and saves energy. Consistent batch performance means every batch works the same.
Tip: Try one or two of these tools on a small batch first. This helps you find what works best before making a lot.
Using these extra tools and enhancements helps you make activated carbon pellets that work better and last longer. You get more control over how good your product is.
Preparing Raw Materials
Grinding Carbon Sources
First, you need to grind your carbon sources into small pieces. This step helps you get the right texture for strong pellets. If you use wood, coal, or coconut shells, break them down with a hammer mill or crusher. You want the pieces to be the right size for making pellets.
A good particle size makes your pellets strong and tough. Grinding helps the pieces stick together better. Smaller pieces give you higher bulk density and better bonding. The table below shows the best sizes and what they do:
Recommended Particle Size | Source | Impact on Pellet Quality |
|---|---|---|
Not bigger than 3.2 mm | Mani et al. | Needed for good pellet quality |
Between 1 and 3 mm | Stelte et al. | Best for moisture and bonding |
Below 5 mm | General Advice | Helps pieces stick together well |
The size of your particles is very important for good pellets.
Smaller pieces make pellets last longer and pack tighter.
You can change how you grind to get the quality you want.
Tip: Check your ground material often. If you see big chunks, grind them again to keep everything even.
Drying and Sieving
After grinding, you need to dry your carbon material. Too much water can cause problems when making pellets. If the material is too wet, pellets may not keep their shape. If it is too dry, the binder may not work well. Use a drying oven or let the material air-dry until it feels dry.
Once dry, you should sieve the material. Sieving takes out dust and pieces that are too big or too small. This step helps you get even size and density. Even size and density make your pellets work better in filters and adsorption systems.
The table below shows how drying and sieving help your final product:
Key Feature | Description |
|---|---|
Makes sure the pellets pack evenly and flow well in systems. | |
Reduced Dust Generation | Keeps your work area cleaner and protects your machines, making them last longer. |
Long Service Life | Helps your filters work better and last longer, which is important for good performance. |
Drying and sieving help you make activated carbon pellets that last longer and work better.
Clean, even material means less dust and fewer problems in your machines.
Uniform pellets give you steady results every time you use them.
Remember: Good preparation now saves you time and trouble later. Always check your material before moving to the next step.
Binder Formulation and Mixing
Selecting a Binder
You must pick the right binder for strong activated carbon pellets. The binder sticks the carbon pieces together. It also affects how well the pellets work. You can choose an organic or inorganic binder. Each type helps in different ways. Organic binders like carboxymethylcellulose or starch keep pellets clean. Inorganic binders like bentonite or lime make pellets stronger. But they can change how the pellets act.
Here is a table to help you compare the main criteria for binder selection:
Criteria for Binder Selection | Description |
|---|---|
Type of Binder | Organic or inorganic |
Availability | Must be readily available |
Cost-effectiveness | Should be economically viable |
Nontoxicity | Should not pose health risks |
Environmental Impact | Should have minimal negative effects |
Mechanical Strength | Must enhance the strength of the pellets |
Adsorption Capacity | Should improve the adsorption properties |
Optimal Proportions | Must be formulated to maintain pellet integrity |
Always check if the binder is easy to find. Make sure it is safe for people and the planet. The binder should help the pellets stay strong and keep their shape.
Tip: Use the right amount of binder. Less than 5% by weight may not work well. Too much binder, like 10% more carboxymethylcellulose, lowers surface area by about 10%. This means the pellets may not adsorb as much.
Mixing Techniques
Mixing the binder with carbon material is very important. You want every part to have the same binder amount. This helps the pellets stay strong and work well.
A pin mixer is good for mixing. It has a fast-spinning shaft and spray nozzles. The nozzles spray liquid binder on the spinning carbon particles. This spreads the binder evenly. You get a uniform mix, which is needed for good pellets.
You can follow these steps for mixing:
Put ground and dried carbon material in the mixer.
Start the mixer and slowly add binder with spray nozzles.
Let the mixer run until the mix looks even and moist.
Check the mix by hand. It should feel sticky but not too wet.
Mixing well saves binder and makes better pellets. Good mixing means you use less binder but still get strong pellets. Uniform mixing helps pellets keep their shape in later steps.
Note: Good mixing means fewer weak spots in your pellets. This helps your activated carbon pellets work better and last longer.
Pelletizing Activated Carbon
Granulation and Molding
You begin by shaping the carbon and binder mix into small pieces. This is called granulation. It helps you get the right size and shape for pellets. You can use machines or your hands to make small balls or cylinders. How you granulate changes how strong and porous the pellets are.
Here is a table that shows the main granulation and molding techniques and how they impact pellet quality:
Technique/Process | Impact on Pellet Quality |
|---|---|
Crushing and grinding of raw hard coal | Prepares raw material for effective granulation and activation. |
Production of paste from binders and coal dust | Ensures proper binding and shaping of granules before carbonization. |
Granulation | Shapes the carbon material into pellets, affecting mechanical strength and surface area. |
Drying and surface hardening of granules | Enhances the durability and stability of the pellets. |
Carbonization | Converts the granulated material into activated carbon, impacting porosity and surface area. |
Activation | Finalizes the properties of activated carbon, crucial for its adsorption capabilities. |
Use of sugar beet molasses as a binder | Results in pellets with optimal properties, lower toxicity, and better performance compared to other binders. |
Each step in granulation and molding changes how the pellets work. Using a good binder like sugar beet molasses makes safer and better pellets.
Tip: Make sure your mix is moist but not too wet. This helps you shape the pellets and keeps them from breaking apart.
Extrusion Methods
Extrusion is a common way to make activated carbon pellets. You push the carbon mix through a machine called an extruder. The extruder shapes the mix into long rods. You cut these rods into small pellets.
Here is a table that compares the main extrusion methods:
Method | Advantages | Disadvantages |
|---|---|---|
Extrusion | – Simple and low cost | – Pellets can be dusty |
Tumble Growth | – Less dust | – Needs more equipment |
Most extruded activated carbon pellets are 3, 4, or 5 mm wide. These pellets help remove VOCs and mercury from natural gas. Their even shape lets air or water flow through easily. This is important for filters. You can also change how you make the pellets to get different pore sizes. This helps you catch certain contaminants.
Note: If you want less dust, try tumble growth. If you need stronger pellets, use extrusion.
Pellet Size Control
You need to control the size of your activated carbon pellets. This helps them work well in filters and other systems. Pellet size changes how fast air or water moves through and how well they trap bad stuff.
You control pellet size during the pelleting step. This step packs loose carbon into dense, even pellets.
Many factories now use image processing to check pellet size quickly. This is faster than old ways like ASTM D1511, which are slow.
The usual size for carbon pellets is 0.5 to 2 mm wide. This size works for most jobs and meets industry needs.
If you keep your pellets the right size, they work better and cause fewer problems. Even size helps you fit more pellets in a filter, so cleaning is better.
Tip: Always check pellet size while making them. This helps you find problems early and keeps your product good.
By following these steps, you can make activated carbon pellets that are strong, even, and ready for many uses.
Carbonization of Pellets
Furnace Setup
Before you start, get your furnace ready. The furnace is very important for this step. It heats the pellets in a special way. You need to keep most of the air out. Too much oxygen can burn the pellets. You want to turn them into carbon, not ash. The furnace removes water and other things from the pellets. This leaves a strong carbon skeleton. The carbon skeleton helps the pellets stay strong. It also gives them the right shape for the next step, which is activation. How well you set up the furnace affects the quality of your pellets. If you do it right, your pellets will be strong and shaped well.
Tip: Always check that your furnace is sealed tight. Even a small leak can let in air and ruin your pellets.
There are different furnaces you can use. Some people use rotary kilns. Others use tube or vertical furnaces. Pick a furnace that matches how many pellets you want to make. Make sure you can control the heat and air flow. You also need a way to collect gases that come out. These gases can be bad for you, so good airflow is important.
Furnace Type | Best For | Key Feature |
|---|---|---|
Rotary Kiln | Large batches | Even heating, easy loading |
Tube Furnace | Small to medium batches | Precise temperature control |
Vertical Furnace | Continuous production | Good for tall pellet stacks |
Heating Process
You need to heat the pellets to the right temperature. This step is very important. If the heat is too low, you do not remove enough water or gases. If the heat is too high, you can hurt the pellets.
Duration: Move to activation right after carbonization
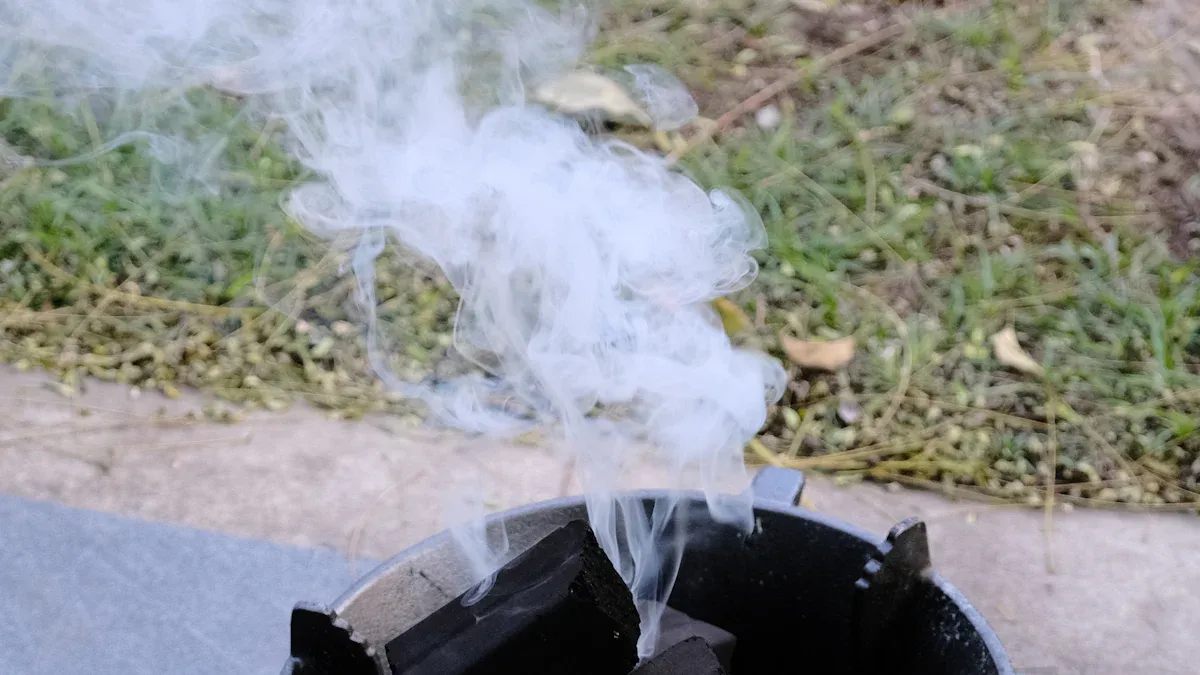
Start by slowly raising the heat. This helps dry the pellets and lets gases out safely. When you reach 800 °C, keep the pellets at this heat. The high heat removes unwanted stuff and leaves only carbon. You do not need to keep them hot for a long time. Once the pellets are carbonized, move them to the next step.
Note: Always watch the temperature with a good thermometer. Quick changes can crack the pellets or make them uneven.
You will see smoke and gas coming out. This is normal. These are the gases leaving the pellets. Make sure your area has good airflow. Wear safety gear to protect yourself from heat and fumes.
When you finish, let the pellets cool down in the furnace. Do not open the furnace right away. If you let air in too soon, the hot pellets can catch fire. Wait until it is cool before you take the pellets out.
If you follow these steps, your activated carbon pellets will have the right structure for the next step. Good carbonization helps your pellets work better in filters and adsorption systems.
Activation Process
Physical Activation
You can make activated carbon pellets work better with physical activation. This method uses gases like steam, carbon dioxide, or oxygen. You heat the pellets inside a furnace. The temperature is usually between 600°C and 1200°C. First, you keep the pellets in a safe gas like nitrogen or argon at 600°C to 900°C. Next, you change to steam or oxygen to finish the activation.
Process Step | Temperature Range (°C) | Atmosphere |
|---|---|---|
Carbonization | 600–900 | Inert (Argon/Nitrogen) |
Activation/Oxidation | 600–1200 | Oxidizing (Oxygen/Steam) |
Physical activation is easy and does not cost much. You do not need lots of chemicals for this step. But it can be hard to get the exact pore size you want. You might not control the surface area as well as with chemical activation.
Chemical Activation
Chemical activation uses special chemicals to make pores in the pellets. You mix the pellets with chemicals like potassium hydroxide, phosphoric acid, or zinc chloride. Then you heat the mix at lower temperatures, usually from 400°C to 700°C. This way, you can control the pore size and surface area better.
Feature | Physical Activation | Chemical Activation |
|---|---|---|
Activation Agents | Water vapor, CO2, oxygen, boron vapor, phosphorus | Potassium hydroxide, phosphoric acid, sodium carbonate, etc. |
Temperature Range | 500–1000 °C | 400–700 °C |
Process Complexity | Simple and cost-effective | More complex and possibly more expensive |
Control of Activation Factors | Hard to control | Easier to control with chemicals |
Porosity and Surface Area | Makes more pores but less control | Can make very porous pellets at lower temperatures |
Residual Chemicals | Not much left over | Some chemicals stay on the pellet surface |
Different chemicals make different kinds of pores. Potassium hydroxide gives a high surface area. Phosphoric acid makes both small and big pores. Zinc chloride can make even higher surface areas than phosphoric acid. You pick the chemical based on the pores you want.
Chemical Activator | Effects on Pore Structure |
|---|---|
K2CO3 | Studied a lot |
KOH | Makes high surface area |
H3PO4 | Makes mixed micropores at high amounts |
ZnCl2 | Makes higher surface area than H3PO4 |
Tip: Always be careful with chemicals. Wear gloves and goggles to stay safe.
Washing and Neutralizing
After chemical activation, you must wash and neutralize the pellets. This step takes away leftover chemicals and ash. If you skip washing, the pellets may not work well or could be unsafe.
You can use different ways to wash:
Method | Description |
|---|---|
Acid Washing | Takes out ash and leftover chemicals from the pores. |
Washing with Water | Rinses away loose chemicals and dirt. |
Hydrochloric Acid Washing | Removes ash, then rinse with water to clean the pellets. |
Here are the main steps for washing and neutralizing:
Wash the activated carbon on a sieve for 12–20 minutes with water moving fast.
Soak the washed pellets for one day so impurities settle.
Filter the water and pellets through a fine mesh sieve.
Dry the pellets in the sun for several hours to get rid of moisture.
Note: Always check if the water is clear before drying. This means you have washed away most chemicals.
Washing and neutralizing help you get clean, safe, and useful activated carbon pellets for air and water filters.
Post-Processing and Quality Control
Final Drying
After activation, you must dry the pellets. Drying keeps them stable and helps them work well. It takes away extra water and keeps their shape. First, put the shaped grains in a rotary kiln at 280 °C. This step drops the water to less than 1 percent by weight. Let the pellets cool down. Then move them to an oven. Set the oven between 30 and 80 °C. Dry the pellets until they have about 10 percent water. These steps help the pellets last longer and work better in filters.
Dry in a rotary kiln at 280 °C to get water below 1 wt%.
Use an oven at 30–80 °C to reach about 10% water after cooling.
Tip: Always check the water level before packing or storing. Too much water can make the pellets work worse.
Sieving and Sorting
After drying, you need to sort the pellets by size. Sieving removes dust and broken pieces. Use a mesh sieve to group pellets by diameter. This gives you batches with even size and shape. Even pellets work better in filters and look more professional.
Use a mesh sieve to sort pellets by diameter.
Remove dust and small pieces.
Collect pellets with the right size for your job.
Sorting also helps you find pellets that did not form right. You can recycle or grind these for another batch. Clean, sorted pellets make your product more reliable.
Quality Checks
You must test your pellets to make sure they are good. Quality checks help you find problems before shipping or using them. You can do many tests to see how well the pellets adsorb chemicals, gases, and dyes.
Here are some common tests you should do:
Iodine adsorption test: Shows how much iodine the pellets hold.
Carbon tetrachloride (CTC) adsorption test: Checks how well the pellets adsorb gases.
Methylene blue test: Shows how well the pellets remove dyes.
Phenol adsorption test: Tests for removing organic compounds.
Butane activity test: Measures how well the pellets adsorb gas.
Molasses number: Shows how well the pellets adsorb big molecules.
Benzene adsorption test: Checks if the pellets remove aromatic compounds.
Chlorine test: Checks chlorine removal.
BET nitrogen adsorption test: Measures surface area and pores.
You should compare your results to industry standards. The table below shows the best values for activated carbon pellets:
Test Name | Best Value/Range |
|---|---|
Iodine Number | 900 to 1100 mg/g |
Moisture Content | Less than 5% |
Apparent Density | 0.4 to 0.5 g/cm³ |
Ash Content | Less than 10% |
BET Surface Area | 800 to 1500 m²/g |
pH Value | Between 6 and 8 |
Abrasion Resistance | Minimal abrasion loss |
Note: If your pellets do not meet these values, you may need to change your process or repeat some steps.
Testing and sorting help you give customers high-quality activated carbon pellets every time. This builds trust and makes your product’s reputation better.
Troubleshooting
You might have problems when making activated carbon pellets. It is important to know how to find and fix these problems. This helps you save time and get better pellets. Here are some common problems and ways to fix them.
1. Chemical Use and Waste
You often need a lot of chemicals for activation. Using too many chemicals can hurt the environment and cost more money. Some chemicals, like potassium hydroxide (KOH), can make dangerous waste. Try to recycle chemicals when you can. Use safer activation agents if possible. You can also change your process to use fewer chemicals.
2. Quality Variability
Different raw materials, like wood or coal, can make pellet quality change. You might see differences in adsorption capacity, strength, or pore size. To fix this, test different activation methods for each type of biomass. Changing your process for each material helps you get more even results.
3. Pellet Strength and Shape
Pellets can break or lose shape when drying or moving them. This can happen if you use too much or too little binder. Check your binder amount and how you mix it. Make sure pellets are moist but not too wet before shaping. If you see many broken pellets, change your binder or drying heat.
4. Dust and Abrasion
Pellets can make dust when you sieve or move them. Dust can block filters and make pellets not last as long. You can lower dust by using tumble growth or adding binders that help stop breaking. Always sieve and sort pellets after drying to get rid of loose pieces.
5. Adsorption Performance
If your pellets do not adsorb well, check the activation step. Low surface area or bad pore structure can make them work worse. Test your pellets with iodine or BET surface area tests. If the results are low, try changing the activation heat or agent.
Here is a table that shows common problems and how to fix them:
Issue | Description | Solution |
|---|---|---|
Large volumes of chemicals required | The process needs a lot of chemicals, which can hurt the environment. | Recycle chemicals and use safer activation agents. |
Generation of hazardous waste | Dangerous chemicals like KOH make harmful waste. | Recycle chemicals and change activation steps. |
Inconsistent quality due to biomass variability | Different biomass types make pellet quality change. | Test activation for each biomass type to get even results. |
Tip: Write down your steps and results each time. This helps you see patterns and fix problems faster.
If you use these troubleshooting tips, you can make better activated carbon pellets. Your process will be safer and more steady. Always test your pellets and change your steps if needed. You will get better pellets and help the environment.
Safety Considerations
Making activated carbon pellets can be dangerous if you do not follow safety rules. You work with high heat, chemicals, and dust. You must protect yourself and your workspace. This section will help you stay safe during every step.
Personal Protective Equipment
You need to wear the right gear when you make activated carbon pellets. This gear keeps you safe from burns, chemicals, and dust. Here is a list of what you should use:
Safety goggles: Protect your eyes from dust and splashes.
Heat-resistant gloves: Keep your hands safe from hot surfaces and chemicals.
Long-sleeved clothing: Cover your arms and legs to avoid burns and chemical contact.
Dust mask or respirator: Stop dust and fumes from getting into your lungs.
Closed-toe shoes: Protect your feet from spills and dropped pellets.
Tip: Always check your gear before you start. Replace anything that looks worn or damaged.
A table can help you remember what each item does:
Equipment | What It Protects Against |
|---|---|
Safety goggles | Dust, chemical splashes |
Gloves | Heat, chemicals |
Long sleeves/pants | Burns, chemical contact |
Dust mask/respirator | Dust, fumes |
Closed-toe shoes | Spills, falling objects |
Chemical and Heat Safety
You use strong chemicals and high heat in this process. Both can hurt you if you are not careful. Always read the labels on chemicals. Follow the instructions for safe use. Never mix chemicals unless you know it is safe.
Store chemicals in labeled containers.
Keep chemicals away from children and pets.
Use a thermometer to check furnace temperature.
Never touch hot equipment with bare hands.
Let pellets cool before you handle them.
Note: If you spill a chemical, clean it up right away. Use water and soap for most spills. For strong acids or bases, use a neutralizer.
If you get a burn or chemical splash, rinse the area with water. Tell someone nearby and get medical help if needed.
Ventilation
Good airflow is very important when you make activated carbon pellets. Dust and fumes can build up fast. You need to keep the air clean so you can breathe easily.
Work in a room with windows or fans.
Use an exhaust hood if you have one.
Keep doors open to let fresh air in.
Do not block vents or fans.
Alert: Never work in a closed space. Fumes from chemicals and heat can make you sick or dizzy.
If you smell strong odors or see smoke, leave the area and get fresh air. Always check that your fans and vents work before you start.
By following these safety steps, you protect yourself and others. You also make better activated carbon pellets because you can focus on your work without worry.
Applications of Activated Carbon Pellets
Water and Air Purification
Activated carbon pellets help clean water and air. They trap bad things and make your space safer. In air cleaning, they catch VOCs, smells, and harmful gases. You find these pellets in air filters at home and in big buildings. Factories also use them. The main thing people check for air is how much the pellets can hold. This is called adsorption capacity. People test this by seeing how long the pellets keep working before letting bad stuff through.
For water, these pellets remove organic pollution, chlorine, and things that taste or smell bad. You see them in water filters, treatment plants, and some home systems. People check how well they work by looking at TOC or COD numbers. If these numbers go down, the water is cleaner.
Takes out VOCs, smells, and gases from air
Cleans organic pollution and chlorine from water
Used at home, in factories, and in city systems
Works measured by breakthrough tests (air) and TOC/COD drop (water)
Industrial Uses
Many factories use activated carbon pellets for different jobs. They use them to clean air, treat water, and help with other work. These pellets help keep places safe and products good. More companies want these pellets because they need better ways to clean things.
Market Aspect | Details |
|---|---|
Main Uses | Air cleaning, water treatment, factory work |
Market Size 2024 | |
Market Size 2032 | USD 10.04 billion |
CAGR (2025-2032) | 8.7% |
Major Regions | Asia Pacific (40.7% market share) |
Key Drivers | Environmental rules, need for cleaning, better ways to make pellets |
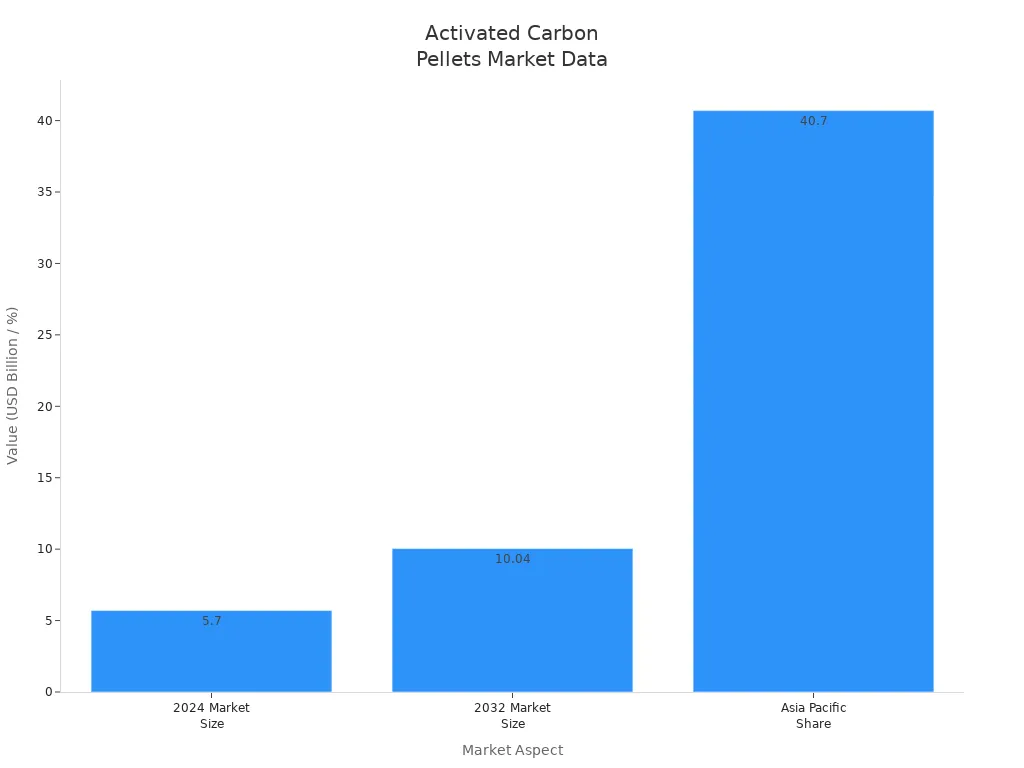
Most of the world uses these pellets for water cleaning. About 30% are for air and gas cleaning. More than 25% are for chemicals, medicine, and food factories. Strong rules and new ways to make pellets make more companies use them.
Rules for the environment make demand go up
More air cleaning systems are used now
People like better and greener ways to make pellets
New ideas help make special kinds of activated carbon
Other Applications
You see activated carbon pellets in many other places. They help stop organic pollution in off-gas systems. They are used to get back solvents, like cyclohexanone. These pellets also clean gases in factories and oil plants. You find them in fixed beds or pressure swing adsorption systems, like helium or natural gas cleaning.
Application Type | Description |
|---|---|
Used in off-gas systems to protect the environment. | |
Solvent recovery systems | Good for getting back solvents like cyclohexanone. |
Gas purification | Cleans factory and oil gases in special beds or pressure swing systems. |
Tip: Pick the right pellet for each job. This helps you get the best cleaning or recovery.
Activated carbon pellets are useful for many jobs. You can use them to meet tough rules and make things safer.
You now know the key steps to make activated carbon pellets. Always check your materials, mix them well, and control the heat during each stage. Wear safety gear and test your pellets for quality. Try small batches first to improve your process. Use the tips in this guide to boost efficiency and get better results. Follow each step closely for the best performance.