


Vous pouvez faire container desiccant at home with simple things like silica gel from kitty litter. This way saves you money. If you use Fresh Step Crystals cat litter, you can make many desiccant packs for less money than store-bought ones. You only need basic supplies and a few easy steps. Beginners think this project is easy to do. Try making your own desiccant and see how well it works to control moisture.
Principaux enseignements
You can make container desiccant at home. Use gel de silice from kitty litter. This helps you save money over buying it in stores.
Pick the best materials for your desiccant. You can use activated clay or calcium chloride. Choose based on what you need to store.
Make desiccant pouches using fabric bags. You can also use paper cups or plastic containers. These help control moisture well.
Always check for safety when you use desiccants. Be extra careful with calcium chloride. This helps stop leaks and keeps things clean.
Change the amount of desiccant you use. Use more or less based on your container size. This helps control moisture better.
Put desiccant packs near the top of your container. Moist air goes up, so this helps absorb moisture faster.
Watch your desiccant to see if it still works. Look for color changes or use moisture test strips. This tells you when to recharge it.
Recharge your desiccant by drying it in the oven. You can also use sunlight. This makes it last longer and keeps it working well.
Materials for Container Desiccant
Picking good materials helps you make a strong container desiccant. You can find choices at home or buy them in stores. Every material has special uses and safety rules.
Silica Gel Options
Kitty Litter Source
You can use silica gel from crystal kitty litter. Try brands like Fresh Step Crystals. These have pure silica gel beads. Pour the crystals into a bowl. Look for dust or scents. Choose crystals with no scent and no dust. Buying a big bag of kitty litter saves money. You can fill many pouches with one bag.
Conseil : Always check the label. Some kitty litter has things added that can hurt stored items.
Commercial Silica Gel
You can buy commercial silica gel online or in hardware stores. These packets come in many sizes. Pick food-grade silica gel for food or delicate items. Some commercial silica gel has color-changing beads. These beads show when the desiccant needs to be recharged.
Clay and Calcium Chloride
Activated Clay
Activated clay is another choice for controlling moisture. You can get it at gardening stores or online. Clay soaks up moisture well and costs less than other desiccants. You can use it for storing many things.
Chlorure de calcium
Calcium chloride takes in more moisture than silica gel or clay. You can buy it as ice melt or moisture absorber pellets. Calcium chloride works best in wet places. It can soak up three times its own weight in water. You need leak-proof containers because calcium chloride turns into liquid when it absorbs moisture.
Type de dessiccateur | Moisture Absorption Capacity |
|---|---|
Chlorure de calcium | |
Activated Clay | 75% of its own weight |
Hanging Container Desiccant | 35% |
Pouch and Container Choices
Fabric Bags
You can use cotton or muslin bags for silica gel or clay. These fabrics let moisture in but keep the desiccant inside. You can sew your own bags or buy them. Tie the bags tight so nothing leaks out.
Paper Cups
Paper cups are a fast choice. Fill a cup with silica gel or clay. Put a coffee filter or paper towel on top. Hold it with a rubber band. This works for small places.
Plastic Containers
Plastic containers with holes in the lid work for bigger spaces. Fill the container with silica gel or calcium chloride. Make sure the lid has small holes for moisture. Use packaging that keeps out leaks.
Description | |
|---|---|
Leakage and Contamination Risks | Think about the risk of leaks or contamination. |
Use of Leak-proof Packaging | Use packaging that keeps moisture out to stop leaks. |
Protective Layers for Sensitive Goods | Add layers to protect sensitive items from contamination. |
You need to think about safety when picking materials for your container desiccant. Always use leak-proof packaging, especially with calcium chloride. Add extra layers if you store delicate things. Check for contamination risks before putting desiccant near food or electronics.
How to Make a Desiccant Container
Making your own desiccant container is simple. You only need a few materials and some basic steps. You can use this guide to learn how to make a desiccant container that fits your needs.
Preparing Materials
Measuring Amounts
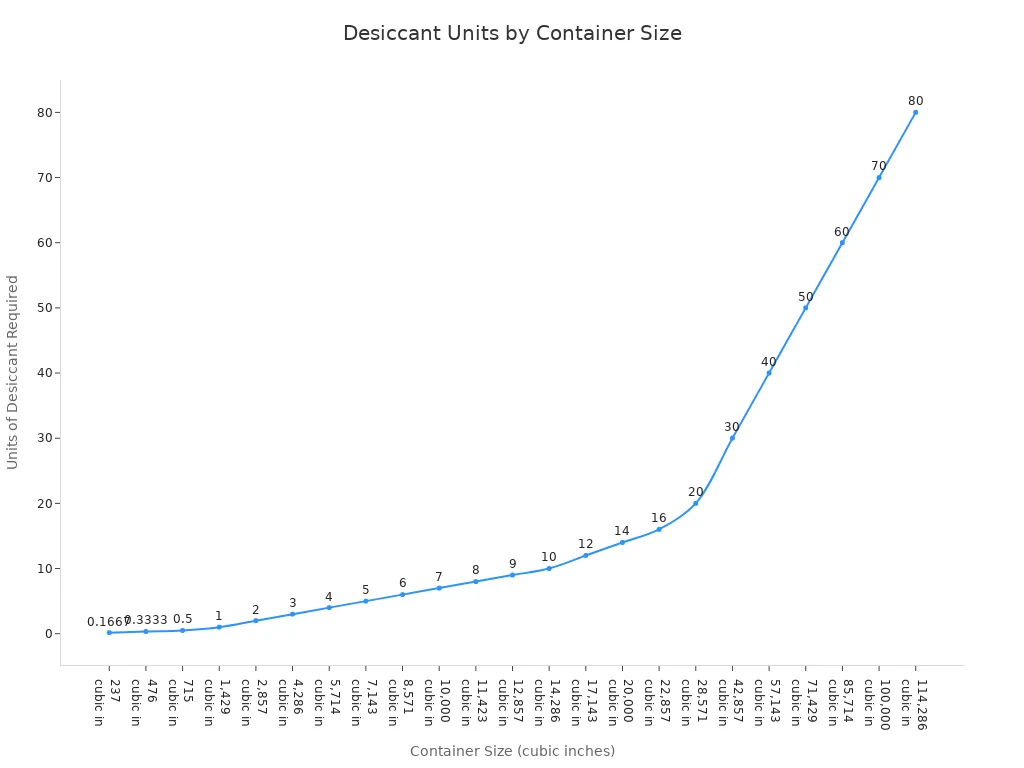
Start by figuring out how much desiccant you need. The amount depends on the size of your storage container. Use this table to help you choose the right amount:
Container Size (cubic inches) | Unités de déshydratant requises |
|---|---|
237 | 1/6 |
476 | 1/3 |
715 | 1/2 |
1,429 | 1 |
2,857 | 2 |
4,286 | 3 |
5,714 | 4 |
7,143 | 5 |
8,571 | 6 |
10,000 | 7 |
11,423 | 8 |
12,857 | 9 |
14,286 | 10 |
17,143 | 12 |
20,000 | 14 |
22,857 | 16 |
28,571 | 20 |
42,857 | 30 |
57,143 | 40 |
71,429 | 50 |
85,714 | 60 |
100,000 | 70 |
114,286 | 80 |
You can also look at this chart to see how the amount of desiccant changes with container size:
Équipement de sécurité
Wear gloves when handling silica gel or calcium chloride. Some desiccant materials can irritate your skin. If you use scissors or a sewing needle, work carefully to avoid injury. Keep all materials away from small children and pets.
Assembling the Container
Filling and Sealing
Follow these steps to assemble your desiccant container:
Gather your materials. You need silica gel, a fabric like muslin or cotton, and sewing tools. You can also use a plastic container with holes in the lid.
Cut two pieces of fabric into the shape you want for your pouch.
Sew three sides together. Leave one side open.
Turn the pouch right side out.
Fill the pouch with silica gel. Leave some space at the top.
Fold in the open edge. Pin it closed.
Sew the top shut to keep the desiccant inside.
If you use a plastic container, fill it with silica gel or calcium chloride. Make sure the lid has small holes. This lets moisture in but keeps the desiccant inside.
DIY Pouch Methods
You can make a pouch from an old cotton shirt or a piece of muslin. Cut the fabric into small squares or rectangles. Sew the sides, fill with desiccant, and close the top. If you do not want to sew, use a small drawstring bag or tie the top with string.
Conseil : Use a double layer of fabric for extra strength. This helps stop leaks.
Adjusting for Container Size
Amount Needed
The size of your storage container decides how much desiccant you need. Use the table above to match your container size to the right amount. For example, a small box (about 237 cubic inches) only needs 1/6 unit of desiccant. A large storage bin (about 10,000 cubic inches) needs 7 units.
Facteur | Description |
|---|---|
Volume of the Container | The total space inside your container. |
Desired Moisture Level | The amount of moisture you want to remove. |
Surface | Bigger surface areas may need more desiccant to keep things dry. |
Conseils de placement
Put the desiccant pouch or container near the top of your storage box. Moist air rises, so this spot works best. Do not let the desiccant touch food or electronics directly. Place a barrier, like a small tray or extra fabric, between the desiccant and your items.
Remarque : Check your desiccant every few weeks. If it feels wet or changes color, it may need to be recharged.
Now you know how to make a desiccant container that fits your needs. You can use these steps for any size container. This method helps you keep your stored items dry and safe.
Make Your Own Desiccant Packs
Creating your own desiccant bag is a practical way to protect your belongings from moisture. You can use simple materials and household items to make your own desiccant. This section will guide you through different methods, from sewing fabric bags to quick solutions using cups and dishes.
DIY Bag Methods
Fabric Bag Filling
You can make a desiccant bag using cotton, muslin, or even ankle stockings. These materials allow air and moisture to pass through but keep the desiccant inside. Here are some effective ways to fill your desiccant bag:
Pour gel de silice beads into the bag. Silica gel absorbs moisture quickly and works well for most storage needs.
Use Art Sorb beads if you want to maintain a specific humidity level. Museums often use these beads for valuable items.
Mix silica gel with a small amount of table salt and water to create a humidity-controlling gel. This method helps balance moisture in sensitive environments.
Regenerate silica gel by heating it in an oven. This process dries out the beads so you can reuse them.
Conseil : Always use dry, clean materials for your desiccant bag. Damp fabric or contaminated beads will not work as well.
Tying Securely
After filling your desiccant bag, you need to close it tightly. This step keeps the desiccant inside and prevents leaks. You can use several methods:
Tie the top of the bag with strong string or twine.
Knot the end if you use an ankle stocking.
Sew the opening shut for extra security.
Use a double knot for organza bags or drawstring pouches.
A secure closure ensures that the desiccant stays in place and does not spill onto your stored items.
Remarque : Organza bags work well for quick projects, but do not put them in the microwave. The material can melt if overheated.
Quick Solutions
Sometimes you need a fast way to control moisture. You can use items you already have at home to make a simple desiccant bag or container desiccant.
Paper Cup Method
A paper cup offers a quick and easy way to hold desiccant. Fill the cup with silica gel or clay. Cover the top with a coffee filter or paper towel, then secure it with a rubber band. Place the cup in your storage area.
The effectiveness of paper cups depends on their coating. The table below shows how different types of paper cups absorb water:
Property of Paper | Without Coating | With PE / PLA Coating |
|---|---|---|
Absorption d'eau | Immediate soaking | No absorption |
Durability in Liquid | Weak in seconds | Holds liquid for hours |
Fiber Structure | Open and porous | Sealed and smooth |
Uncoated paper cups absorb water right away, so use them for short-term solutions. Coated cups last longer and hold the desiccant better.
Shallow Dish Technique
You can also use a shallow dish or tray to hold desiccant. Spread silica gel or clay in a thin layer. Place the dish in your storage container. This method works best for large spaces or when you need to recharge the desiccant quickly.
Use a ceramic or glass dish for best results.
Make sure the dish does not touch food or electronics directly.
Check the desiccant often and replace or recharge it when needed.
📝 Conseil : Repurpose organza bags from gifts or events for a quick desiccant bag. Fill the bag, tie it off, and place it in your storage area. You do not need to sew anything.
You can make your own desiccant packs in many ways. Choose the method that fits your needs and materials. Whether you sew a fabric bag or use a paper cup, you can protect your items from moisture and keep them safe.
Using Container Desiccant
Placement in Storage
Optimal Locations
You want your container desiccant to work well. Put your desiccant where moisture gathers. Spread the packs around your storage space. This helps soak up moisture everywhere. Do not put all packs in one spot. Place them in different areas for better protection.
Keep your desiccant in airtight containers when you are not using it. This stops it from soaking up water from the air. Do not let the packs sit in sunlight or near heat. Hot places make silica gel and other desiccants work less well. If your storage is near doors or gets hot and cold, use more packs for extra help.
📝 Conseil : Use a hygrometer to check how wet the air is. If the number is high, add more desiccant or try a dehumidifier.
Éviter le contact direct
Do not let desiccant packs touch your stored things. This is very important for electronics, food, and delicate items. Put trays, separators, or extra wrapping between the packs and your stuff. This keeps things safe and stops problems. Silica gel is safe, but you should not let it touch your valuables.
If you use big containers, put the desiccant near the top. Wet air goes up, so this spot works best. For places near doors, use extra packs to stop water drops from forming.
Monitoring Moisture
Visual Indicators
You can see if your desiccant is working by checking for color changes. Many silica gel packs have beads that change color when wet. Blue beads turn pink, and orange beads turn green. These colors show when you need to dry or swap the pack.
⚠️ Remarque : Always look at your desiccant’s color often. If it changes, dry the pack in the oven or get a new one.
Moisture Test Strips
Moisture test strips help you see how wet your storage is. Put a strip close to your desiccant pack. The strip changes color if there is moisture. Use these strips to know when to dry your packs.
Here is a table that shows how well visual indicators and moisture test strips work:
Source | Précision | Notes |
|---|---|---|
±5% | Do not let strips touch water or steam. High heat lowers accuracy. | |
AGM Container | ±5% at 75°F | Use a correction factor for temperatures outside 75°F. |
EDC Supply | Maximum humidity level | Shows maximum, not exact percentage. |
You can trust these tools for regular checks. They help you keep your storage dry and safe. If you see high moisture, add more desiccant or dry your packs.
Recharging and Reusing Desiccant
You can use your desiccant more than once. Recharge it before it stops working. This saves you money and keeps things dry. Learn the best ways to dry desiccant. Watch for signs that show it needs help.
Drying Methods
Séchage au four
Oven drying works very well for recharging desiccant. Spread beads or pellets in one layer on a baking sheet. Heat your oven to 250°F to 300°F. Put the tray in the oven. Let it heat for 2 to 4 hours. This dries out the desiccant and makes it work again.
Méthode | Température (°F) | L'heure | Notes |
|---|---|---|---|
Four | 250–300 | 2–4 hours | Effective, but takes time. |
Micro-ondes | Low power | 5–10 minutes | Quick, but may damage some desiccants. |
Vacuum Chamber | N/A | N/A | Works well, but not common at home. |
📝 Conseil : Use a shallow tray for drying. Spread the desiccant out flat. Do not use high heat. Too much heat can ruin the beads.
Sunlight Exposure
You can also dry desiccant in the sun. Put beads or packs on a clean tray outside. Sunlight helps water leave the desiccant. This works best on hot, dry days. Leave the packs in the sun for several hours. Sun drying is gentle and does not melt or burn the material.
Put packs on a tray or towel.
Leave them in the sun for 4 to 8 hours.
Make sure they are dry before using them again.
Signs for Recharging
Color Change
Some desiccants change color when wet. Silica gel beads start blue or orange. Blue beads turn pink when wet. Orange beads turn green when wet. This shows you when to dry the desiccant.
Indicating silica gel lets you see moisture levels. You can tell when beads are full of water. Orange beads fade to yellow or white as they soak up water. These color changes help you keep things safe.
Saturation
Look for other signs that your desiccant is full. Beads may stick together or feel wet. If your storage feels damp, the desiccant may not work. If items get wet, recharge or replace the packs.
Color change you can see
Beads clump or feel wet
Packs do not keep things dry
Stored items show water damage
Silica gel can be recharged four to six times. How many times depends on how you care for the packs. It also depends on your storage area. After a while, you must get new desiccant to keep things dry.
⚠️ Remarque : Check your desiccant often. Recharge it at the right time. This keeps your storage safe and stops damage.
Safety and Troubleshooting
Handling Precautions
Protective Equipment
You should protect yourself when using desiccant materials like calcium chloride and silica gel. Wear gloves to keep your skin safe. Put on safety glasses to shield your eyes from dust or spills. If you use a lot, wear a mask so you do not breathe in tiny bits.
If you breathe in dust, go outside for fresh air and get help from a doctor.
If desiccant gets in your eyes, take out contact lenses and rinse your eyes with water for 15 minutes. Get medical help.
If it touches your skin, wash with soap and water. Take off any dirty clothes.
If you swallow a lot, do not try to throw up. Call a doctor right away.
🛡️ Conseil : Work in a place with good airflow. Keep water close in case you need to wash your skin or eyes.
Child and Pet Safety
Keep desiccant away from children and pets. These materials can look like candy or food. Store them in closed containers. Write clear labels on the containers. If a child or pet touches or eats desiccant, call a doctor or vet fast.
Disposal and Replacement
Élimination en toute sécurité
Throw away used desiccant the right way. Do not put wet or dirty desiccant in the trash. Put it in a closed bag before you toss it. Some places want you to take chemicals to a special drop-off spot. Check your local rules for safe disposal.
Quand remplacer
Check your desiccant often. Change it if it feels wet, sticks together, or changes color. Watch the condition of the desiccant regularly. Replace it sometimes to keep moisture away. Store unused desiccant in airtight containers. This keeps it dry and ready to use.
🔄 Remarque : If you see mold or rust in your storage, change the desiccant right away.
Problèmes communs
Overfilling
Using too much desiccant can cause trouble. If you overfill, it may leak or spill. When the container is packed too full, moisture does not spread well. This can make water drops form and damage electronics or food.
Wrong Materials
Picking the wrong desiccant can hurt your stored things. Some types do not turn moisture into gel. They keep it as liquid, which can leak and cause mold or rust. Always choose the right kind for your items.
Issue | Goods Affected | Desiccant Solution |
|---|---|---|
Condensation (Container Rain) | Electronics, food | Silica Gel, Calcium Chloride |
Croissance des moisissures | Textiles, leather | Chlorure de calcium |
Corrosion | Machinery, metals | Activated Clay, Calcium Chloride |
Leaks from desiccants can add water to your storage. This can start a cycle that causes container rain. Mold and rust can also show up if you use the wrong kind or too much desiccant.
⚠️ Conseil : Always check your storage for leaks and wet spots. Use the right desiccant for each item.
You can make container desiccant at home. Use easy steps and things you already have. Homemade desiccant helps keep your stuff safe from moisture. Make sure your desiccants stay dry. Recharge silica gel in the oven when it gets wet. Use indicator crystals to see if moisture is high. Try making small holes in the lid for air to move. Add Tyvek to the lid to keep out dust. You can try different ways and materials. Ask questions or share ideas in the comments.
Keep desiccants dry so they work well.
Dry silica gel in the oven when needed.
Use indicator crystals to check if it is time to dry.
Make airflow holes with a hot needle.
Glue Tyvek inside the lid to block dust.
Heat silica gel at 120°C to keep the dye safe.
Humidity cards may not work well if you open the container a lot.