


You should store desiccant in an airtight container and keep it in a cool, dry spot. This keeps moisture away and helps your desiccant last longer. Many people make mistakes by leaving desiccant in humid rooms or using too much at once. Try zip seal bags or jars with tight lids. Always check that the container closes well. Storing desiccant the right way is simple and saves you trouble later.
Key Takeaways
Put desiccant in airtight containers. This keeps water out and helps it last longer.
Pick the right container, like zip seal bags or glass jars. Match the container to how much desiccant you have.
Keep desiccant in a cool and dry spot. Keep it away from heat and wet places so it works well.
Check your desiccant often for color changes or clumps. This helps you know if it is still working.
Write clear labels with warnings and dates on containers. This stops mix-ups and keeps people safe.
Use the first-in, first-out rule to use older desiccant first. This helps you not waste any.
Close containers right after you use them. This keeps air and water out.
Follow safety rules and keep desiccant away from kids and pets. This helps stop accidents.
Desiccant Storage Basics
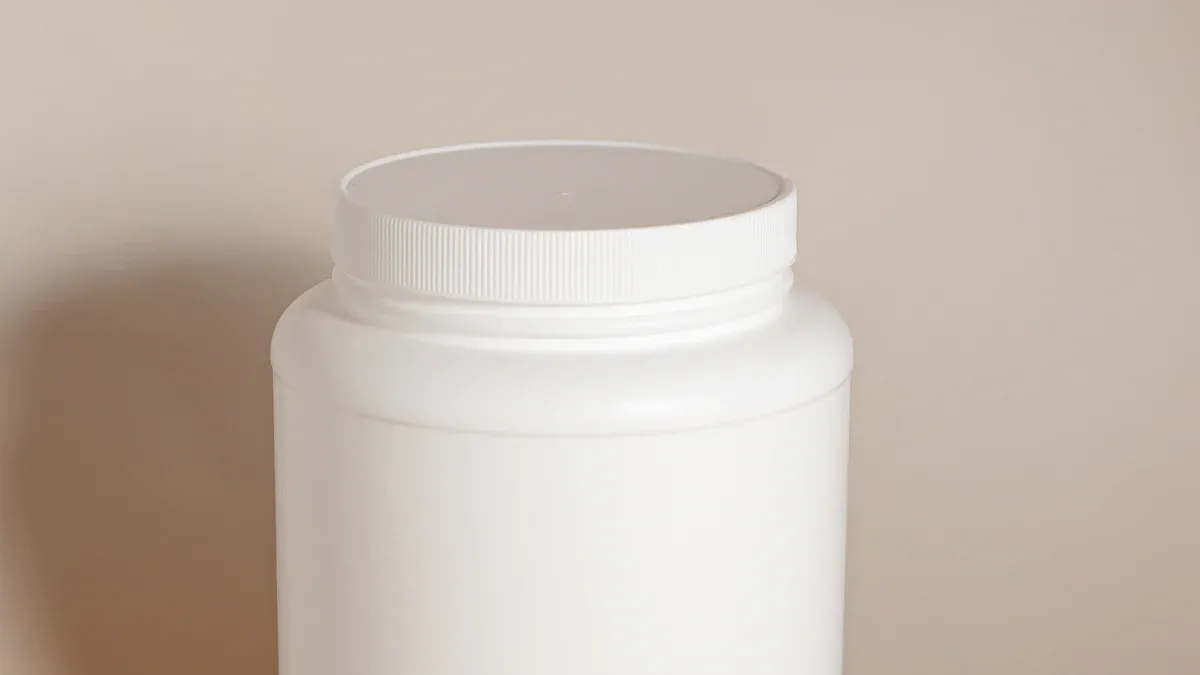
Airtight Containers
Keeping your desiccant dry starts with the right container. You want to block out as much air and moisture as possible. This helps your desiccant stay fresh and ready to use.
Container Types
You have a few good options for storing desiccant. Zip seal bags work well for small amounts. Glass jars with tight lids are great for larger batches. Some people use metal tins or plastic containers with snap-on lids. If you store seeds, powders, or electronics, you can put desiccant packets right in the same container. This keeps everything dry and safe.
Tip: Always pick a container that closes tightly. Even a small gap can let in moisture.
Sealing Tips
Make sure you press out extra air before sealing a zip bag. For jars or tins, twist the lid until it feels snug. You can add a strip of tape around the lid for extra protection. If you open the container, close it again right away. The less time your desiccant spends in open air, the better it works.
Desiccants work by pulling water vapor from the air. They do this best in airtight spaces. Scientists use airtight desiccators to keep moisture away from sensitive items. When you use a tight container, you help your desiccant last longer and work better.
Cool, Dry Locations
After you seal your desiccant, you need to pick the right spot to store it. Heat and humidity can ruin your hard work.
Best Places to Store
Look for a place that stays cool and dry. A closet shelf, a drawer, or a pantry works well. Some people use a cabinet in a room with air conditioning. If you live in a humid area, avoid basements or bathrooms. These places often have too much moisture in the air.
Avoiding Heat and Humidity
Keep your desiccant away from windows, stoves, or heaters. Sunlight and heat can make the container sweat inside. This adds moisture and makes the desiccant less effective. Try to store your container off the floor, since floors can get damp. If you notice the room feels sticky or warm, move your desiccant to a better spot.
Note: A cool, dry place helps your desiccant last longer and keeps your stored items safe from moisture.
Choosing Containers for Desiccant
Material Options
Picking the right container makes a big difference in keeping your desiccant dry and safe. You have three main choices: glass, plastic, and metal. Each one has its own strengths and weaknesses.
Glass, Plastic, Metal
Glass containers work well because they do not let odors or bacteria stick around. You can clean them easily, and they do not react with most things. The downside is that glass can be heavy and might break if you drop it. Plastic containers are light and cheap. You can find them in many shapes and sizes. Some plastics may absorb smells or let chemicals mix with your desiccant, so you need to choose food-safe plastic if you store food. Metal containers last a long time and block moisture well. They are strong and recyclable. Sometimes, metal can react with certain items, so check if your desiccant is safe with metal.
Here’s a quick look at the pros and cons:
Container Type | Advantages | Disadvantages |
|---|---|---|
Glass | Non-porous, easy to clean, environmentally friendly | Heavy, breakable, limited shapes |
Plastic | Lightweight, affordable, microwave safe | Can absorb odors, may leach chemicals |
Metal | Durable, recyclable, strong barrier | Heavier, reactive with some foods |
When you choose a container, think about how well it keeps out water vapor. Glass and metal usually block moisture better than plastic. If you want the best protection, pick a container with a low water vapor transmission rate.
Size and Capacity
You need to match your container size to the amount of desiccant you plan to store. If you use a container that is too big, you may waste space and let in extra air. If it is too small, you might not fit all your packets or beads.
Matching Container to Amount
Here’s a simple guide to help you pick the right size:
Container Size | Desiccant Size |
|---|---|
1 pint up to 1 quart Mason jar | 50cc |
1 gallon Mylar bag | 300cc |
5 gallon bucket (low air volume) | 1000cc |
5 gallon bucket (high air volume) | 2000cc |
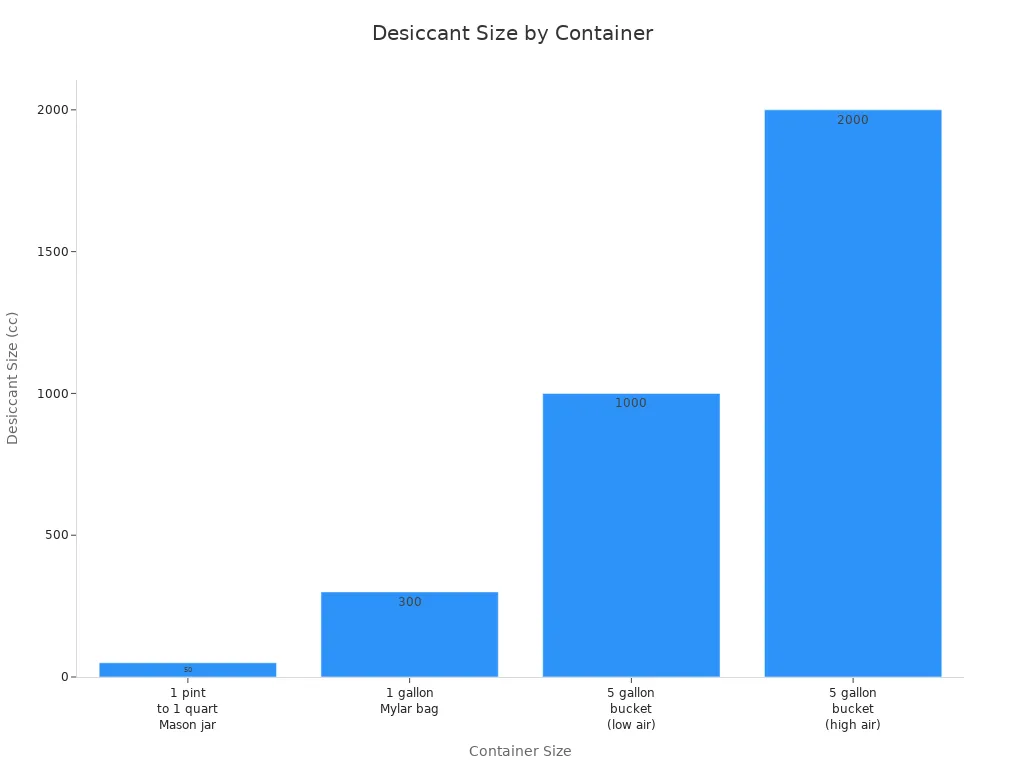
If you store food, seeds, or powders, make sure you use enough desiccant to keep everything dry. Not using enough can lead to mold or spoilage. Always check the air space in your container and adjust the amount of desiccant as needed.
Labeling
Labeling helps you stay organized and keeps everyone safe. You do not want someone to mistake desiccant for food or forget what is inside a jar.
Organizing Multiple Types
Try these tips for labeling your containers:
Write the full name of the product in English. Skip abbreviations.
Add a clear warning like “Do Not Eat” if you store desiccant with food.
Use a permanent marker or a strong adhesive label so the writing does not fade.
Include the date you filled the container.
If you use color-changing beads, make sure the label says what they are for.
Tip: Check your labels often. If they start to fade or peel, replace them right away.
Clear labeling helps you avoid mix-ups and keeps your storage safe. You can organize different types of desiccant by using color-coded labels or separate shelves. This makes it easy to find what you need and prevents cross-contamination.
Keeping Desiccant Effective
Regular Checks
You want your desiccant to work every time you use it. Regular checks help you spot problems before they ruin your stored items. Experts say you should inspect your desiccant every 6 to 12 months. This routine keeps moisture away and helps you catch issues early.
Signs of Saturation
How do you know when your desiccant is full of moisture? Look for these signs:
Color-changing beads turn from orange or blue to green or pink.
Clay desiccants get clumpy or hard.
Silica gel feels sticky or soggy.
You see condensation or mold inside your container.
If you notice any of these, it’s time to replace or recharge your desiccant. Some brands use color-changing beads, which make it easy to see when you need a new packet.
Contamination Indicators
Sometimes, desiccant can get dirty or damaged. You should check for:
Torn packets or broken beads.
Strange smells coming from the container.
Visible dirt or stains on the desiccant.
Signs of pests or insects.
If you find any of these, throw out the old desiccant and use a fresh one. Clean containers before adding new packets.
Stock Rotation
You want your storage to stay fresh and reliable. Using a first-in, first-out (FIFO) system helps you do that. This means you use the oldest desiccant first and add new packets to the back of your supply.
First-In, First-Out
Here’s why FIFO works well:
You keep your storage fresh and avoid using expired packets.
You reduce waste and save money.
You make sure your items stay dry and safe.
You help products last longer, even during seasonal changes.
Tip: Place new packets behind older ones. Mark the date on each packet so you know which to use next.
Quick Resealing
Every time you open a container, your desiccant meets fresh air. The longer it stays open, the more moisture it absorbs. You should reseal containers as quickly as possible.
Open the container only when you need to.
Close the lid tightly right after you finish.
Press out extra air before sealing zip bags.
Use vacuum sealing for extra protection if you store sensitive items.
If you keep exposure time short, your desiccant stays strong. Leaving packets out for hours can make them less effective. Always keep them in airtight containers to stop moisture from sneaking in.
Note: Quick resealing keeps your desiccant working longer and protects everything you store.
Safety Tips for Desiccant
Handling Safely
You want to keep yourself safe when you handle desiccant. Most types are not dangerous, but you should still avoid direct contact. Silica gel can cause mild irritation if it touches your skin or gets in your eyes. Sometimes, you might notice redness or feel a little itchy. If you get desiccant on your hands, wash them with soap and water. If it gets in your eyes, rinse them with clean water right away.
Avoiding Contact
Here are some things to watch out for:
Skin contact with silica gel can lead to irritation.
Eye contact with silica gel can also result in irritation.
In rare cases, desiccants may cause mild irritation to the skin, eyes, or stomach.
You can wear gloves if you handle large amounts. Try not to rub your eyes after touching desiccant. If you feel any discomfort, clean the area and ask an adult for help.
Child and Pet Safety
Kids and pets get curious. You need to keep desiccant out of their reach. Many accidents happen when children or animals find packets and try to play with them or put them in their mouths.
Storing Out of Reach
Let’s look at some smart ways to keep desiccant safe:
Strategy | Description |
|---|---|
Keep out of reach | Store desiccants in high cabinets or locked areas to prevent access. |
Use appropriate containers | Use child-proof containers or bags that are hard for kids and pets to open. |
Label clearly | Mark storage areas so everyone knows desiccants are inside. |
You can collect silica gel packets and put them in a special spot. Some people make bigger fabric bags to hold the pellets. This makes them harder to swallow. Place these bags in safe places around your home. Always keep desiccant away from play areas. Tell children not to touch packets unless an adult is with them.
Preventing Ingestion
Accidental swallowing happens more often than you might think. In 2009, about 38,000 people reported eating silica gel packets. Most were kids under six years old. Usually, poison control experts tell parents not to worry, since small amounts are not very harmful. Still, you want to avoid these accidents.
Warning Labels
You can make your storage even safer with clear warning labels. Try these ideas:
Use bright or contrasting colors so labels stand out.
Pick unique shapes for containers so they are easy to spot.
Print “DO NOT EAT” in large, bold letters.
Put warning labels on the canister, bottle, lid, and packaging.
Tip: If you store desiccant with food or medicine, double-check that every container has a warning label. This helps everyone stay safe.
Regenerating Desiccant
When to Regenerate
You might wonder when it’s time to bring your desiccant back to life. You don’t need fancy tools to spot the signs. Just look for simple clues. Color-changing beads make it easy. If most of the beads have turned from orange or blue to green or pink, that means they’re full of moisture. Clay desiccants get hard or clumpy. Silica gel can feel sticky. If you notice condensation inside your container, it’s time for action.
Visual Signs
Here’s a quick table to help you decide when to regenerate:
Indicator Type | Warning Signs | Recommended Action |
|---|---|---|
Visual | Color change in beads | Replace when 80% changed |
Performance | Moisture readings >5ppm H2O | Replace or regenerate |
Time-Based | Operating hours exceeded | Follow manufacturer advice |
If you see these signs, don’t wait. Regenerating keeps your storage safe and dry.
Regeneration Methods
You have a few ways to dry out your desiccant and make it work like new. Oven drying is the most popular. Microwave drying works for small batches. Always follow safety tips to avoid overheating or damaging your packets.
Oven Drying
Oven drying is simple. Preheat your oven to the right temperature. Spread the desiccant in a thin layer on a baking sheet. For Tyvek bags, use 245°F and dry for up to 24 hours. Silica gel works best at 220°F for the same time. If you use general packets, bake at 150°F for 12 to 18 minutes. Check every so often to make sure you don’t overheat them.
Tip: Use a convection oven if you have one. Keep packets spaced out so air can move around them.
Other Techniques
Microwave drying is quick for small amounts. Place silica gel in a Pyrex dish. Set your microwave to medium. Run it in short bursts of 3 to 5 minutes. Stir and check the color after each round. You’ll usually finish in about 10 to 12 minutes. For best results, use intervals of 1 to 2 minutes and check often.
Other methods, like filament dryers, don’t work as well. Stick to ovens or microwaves for safe and effective results.
Storing After Regeneration
Once your desiccant is dry, you need to store it right away. Don’t let it sit out in the open. Put it in an airtight container as soon as it cools. Label each batch with the date you reactivated it. This helps you track how many times you’ve used it. Try to avoid leaving it out for long periods. Check your packets every month for color changes or signs of moisture.
Label batches with reactivation dates.
Avoid prolonged air exposure.
Check monthly for saturation or discoloration.
Note: Quick storage after regeneration keeps your desiccant working at its best.
Desiccant Storage Checklist
Step-by-Step Guide
You want to keep your desiccant fresh and working well. Here’s a simple checklist you can follow every time you store desiccant:
Choose the Right Container
Pick an airtight container like a zip seal bag, glass jar, or metal tin. Make sure it closes tightly.Check for Cleanliness
Wash and dry your container before you add desiccant. Dirt or moisture can ruin your packets.Add the Correct Amount
Use enough desiccant for the size of your container. If you store food or seeds, check the recommended amount.Seal Immediately
Press out extra air if you use a bag. Twist lids until snug. Add tape for extra protection if needed.Label Clearly
Write the name, date, and a warning like “Do Not Eat” on your container. Use a marker or strong label.Pick a Cool, Dry Spot
Store your container in a closet, pantry, or drawer away from heat and humidity.Keep Out of Reach
Place desiccant where kids and pets cannot get to it. Use high shelves or locked cabinets.Check Regularly
Look for color changes, clumps, or damage every few months. Replace or regenerate if needed.Rotate Stock
Use older packets first. Add new ones to the back. Mark dates to help you remember.Regenerate When Needed
Dry out saturated desiccant in the oven or microwave. Store it again right away.
Tip: If you follow these steps, you will keep your desiccant strong and your stored items safe.
Quick Tips
Want to make things even easier? Try these quick tips:
Tip | Why It Helps |
|---|---|
🏷️ Label everything | Prevents mix-ups and keeps everyone safe |
🧤 Wear gloves | Avoids skin irritation when handling large amounts |
🚫 Keep away from food prep areas | Stops accidental ingestion |
📅 Set reminders | Helps you remember to check and rotate stock |
🌡️ Avoid hot spots | Keeps desiccant working longer |
🕒 Reseal fast | Reduces moisture exposure |
Always store desiccant in airtight containers.
Never leave packets out in the open.
Use color-changing beads for easy checks.
Keep warning labels bright and bold.
Store regenerated desiccant right after drying.
Note: You don’t need fancy tools or expensive supplies. Just follow these tips and your desiccant will stay ready for action!
Mistakes to Avoid
When you store desiccant, you want to get the best results. Some mistakes can ruin your efforts and leave your items at risk. Let’s look at the most common slip-ups and how you can dodge them.
Wrong Containers
Choosing the wrong container is a big mistake. If you use a container that doesn’t seal tightly, moisture sneaks in. Desiccant starts absorbing water from the air as soon as you open the packet. If you leave packets exposed or use a lid that doesn’t fit, your desiccant gets saturated before you even use it.
Here are some problems you might face:
Loose lids let air and moisture inside.
Thin plastic bags can tear or leak.
Containers with cracks or gaps don’t protect your desiccant.
Overstuffing with too many packets wastes resources and can mess up moisture control.
Using too few packets means your items won’t stay dry for long.
Tip: Always pick a sturdy, airtight container. Check for cracks or weak spots before you store anything.
Skipping Checks
You might think your desiccant is fine once you seal it up, but skipping regular checks can cause trouble. Desiccant can get saturated or contaminated over time. If you don’t test or inspect your packets, you risk mold, spoiled food, or damaged electronics.
Common mistakes include:
Forgetting to look for color changes in beads.
Ignoring clumps or sticky spots.
Not checking for torn packets or dirt.
Reusing packets without drying them out first.
If you skip these steps, your desiccant won’t work as well. You could end up with ruined supplies or unhappy customers if you sell products.
Mistake | What Can Happen |
|---|---|
Skipping inspections | Mold, spoilage, damage |
Not testing packets | Poor moisture control |
Reusing without drying | Weak protection |
🕵️♂️ Set a reminder to check your desiccant every few months. It only takes a minute and saves you a lot of hassle.
Ignoring Safety
Safety matters when you handle desiccant. If you ignore safety rules, you put yourself, kids, and pets at risk. Some people forget to label containers or leave packets where children can reach them. Others don’t wear gloves when handling large amounts.
Here’s what you should watch out for:
Leaving packets in food prep areas can lead to accidental ingestion.
Not labeling containers makes it easy to mix up desiccant with food.
Storing packets within reach of kids or pets invites accidents.
Handling desiccant with bare hands can cause skin irritation.
⚠️ Always use clear warning labels. Store desiccant high up or in locked cabinets. Wear gloves if you handle a lot at once.
If you avoid these mistakes, you keep your desiccant working well and everyone safe. Simple steps make a big difference!
You now know how to keep your desiccant working its best. Use airtight containers, pick cool and dry spots, and check your packets often. Follow the checklist and safety tips to avoid mistakes. When you store desiccant the right way, you protect your food, gear, and supplies from moisture. Good storage saves you money and keeps everything fresh. Ready to get started? Your desiccant will thank you!